
How to zero your rifle scope step by step

Zeroing a rifle scope is a crucial process that ensures your firearm operates with maximum accuracy. Without proper zeroing, even the most advanced scopes can lead to missed targets and immense frustration. This guide will walk you through the essential steps to effectively zero your rifle scope, allowing you to enhance your shooting skills and confidence.
The concept of zeroing revolves around aligning your rifle’s point of impact with its point of aim. When your scope is correctly zeroed, your bullets will strike exactly where you are aiming, regardless of distance. Understanding how to properly adjust your scope is vital for achieving optimal accuracy in various shooting conditions.
In this article, we will cover the necessary tools, techniques, and tips needed for successful zeroing. Whether you’re a novice shooter or an experienced marksman, mastering this process is essential for both safety and performance in the field. Get ready to enhance your shooting experience by ensuring your rifle is zeroed to perfection.
Preparing Your Rifle and Scope for Zeroing
Before you begin the zeroing process, it is crucial to prepare both your rifle and scope to ensure maximum accuracy. Start by selecting a stable shooting position, such as a bench rest or a prone position, to minimize any external movement. This stability allows you to focus solely on your rifle’s performance.
Next, ensure your rifle is clean and well-maintained. Inspect the bore for any debris or obstructions that could affect bullet performance. A clean barrel promotes better accuracy, making it easier to determine where your shots land relative to your point of aim.
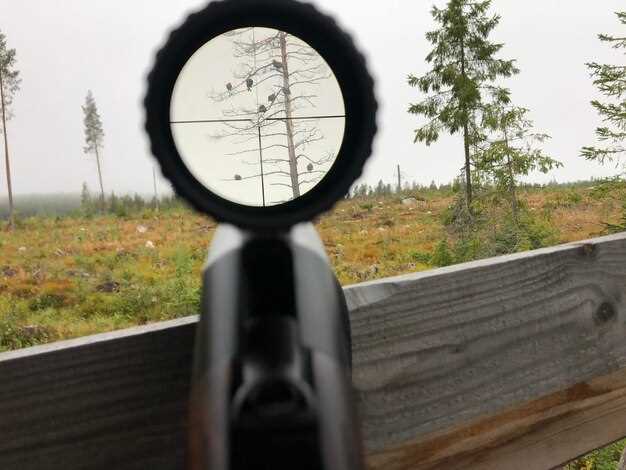
Then, mount your scope securely. Double-check that the scope rings are tightened to specification, as any movement during the shooting process can lead to inaccurate adjustments. Make sure the reticle is level, as a canted reticle can introduce significant errors in your shots.
It is also essential to set your eye relief correctly. The optimal eye relief will allow you to see the entire field of view through the scope while avoiding any risk of scope bite. Position your scope at a distance that feels comfortable, aligning your eye with the sight picture.
Additionally, confirm that the turret adjustments on your scope are functioning properly. They should click distinctly when rotated. Familiarize yourself with your scope’s adjustment increments to make precise corrections while zeroing.
Finally, choose the appropriate ammunition for your rifle. Different loads can significantly affect accuracy, so select a brand and type that your rifle is known to shoot well. Consistency in ammunition contributes to consistent results during the zeroing process.
Adjusting Scope Elevation and Windage for Accurate Zeroing
To achieve pinpoint accuracy, adjusting your rifle scope’s elevation and windage is crucial. Begin by identifying your target range, typically 100 yards for standard zeroing. Ensure your rifle is securely mounted in a stable position to minimize movement during adjustments.
Elevation adjustments control the vertical alignment of the reticle. Most scopes have marked dials or turrets indicating the direction and amount of change. To raise the crosshair, turn the elevation turret in the appropriate direction, usually indicated as “up.” Conversely, to lower the crosshair, turn it “down.” Each click generally corresponds to 1/4 MOA (Minute of Angle) at 100 yards, meaning that a full rotation will shift the impact point significantly.
Windage adjustments affect the horizontal alignment of the reticle. Similar to elevation, locate the windage turret, usually marked as “left” and “right.” To shift your point of impact to the right, turn the turret toward the right, and for left adjustments, turn it left. Pay attention to the magnitude of each adjustment to ensure your corrections are within the desired accuracy parameters.
Once adjustments are made, fire a group of shots at the target. Analyze the results to see how closely the bullets match your intended point of impact. This grouping will provide a basis for further adjustments. If your shots cluster consistently in one direction, fine-tune your elevation and windage accordingly, repeating the process until you achieve the desired zero.
Remember to account for factors such as bullet drop and wind conditions when zeroing your scope. Environmental factors can significantly affect accuracy. Regularly checking and re-adjusting your zero, especially after transporting your rifle or changing ammunition, ensures that your scope maintains its precision.
Verifying Zero and Fine-Tuning for Optimal Accuracy
Once you have completed the initial zeroing of your scope, it is crucial to verify the zero to ensure accuracy at your desired range. Begin by selecting a distance that matches your shooting needs, typically 100 yards for most rifles. Using a stable shooting position, fire three rounds at a target, observing where the bullets impact.
After firing, analyze the group size and the position of your shots in relation to the target’s center. If your shots are concentrated closely together but off-center, adjustments can be made to your scope. On the other hand, if your shots are widely dispersed, this may indicate a need to revisit your shooting technique, such as your stance and trigger control.
Adjust your scope according to the manufacturer’s specifications. Most scopes will have windage and elevation turrets that allow for precise adjustments in increments, such as 1/4 MOA. If your shots are low, turn the elevation turret clockwise; if they are high, turn it counterclockwise. For lateral adjustments, use the windage turret similarly based on the direction of the bullet impact.
After making adjustments, fire another group of three rounds. Continue this process of shooting, evaluating, and fine-tuning until your shots consistently land at the center of your target. This iterative approach solidifies your zero and enhances confidence in your rifle’s performance.
Additionally, consider documenting your adjustments and the corresponding distances used for future reference. This record can aid in quickly restoring zero after transporting your rifle or changing ammunition types. Remember that various factors, such as atmospheric conditions and bullet type, can influence accuracy, so remain adaptable in your approach.
Ultimately, fine-tuning your zero is a vital step in achieving optimal accuracy and ensuring that your rifle performs as intended across various scenarios. Consistency in practice will lead to greater proficiency and confidence in your shooting abilities.


